使用 mmap
内存映射(Mmap)支持对磁盘上大文件的直接内存访问,允许 Milvus 将索引和数据存储在内存和硬盘中。这种方法有助于根据访问频率优化数据放置策略,扩展 collection 的存储容量,而不会显著影响搜索性能。本页面帮助您了解 Milvus 如何使用 mmap 实现快速高效的数据存储和检索。
概述
Milvus 使用 collection 来组织向量嵌入及其元数据,collection 中的每一行代表一个 entity。如下图左侧所示,向量 field 存储向量嵌入,标量 field 存储其元数据。当您在某些 field 上创建了索引并加载 collection 时,Milvus 将创建的索引和 field 原始数据加载到内存中。
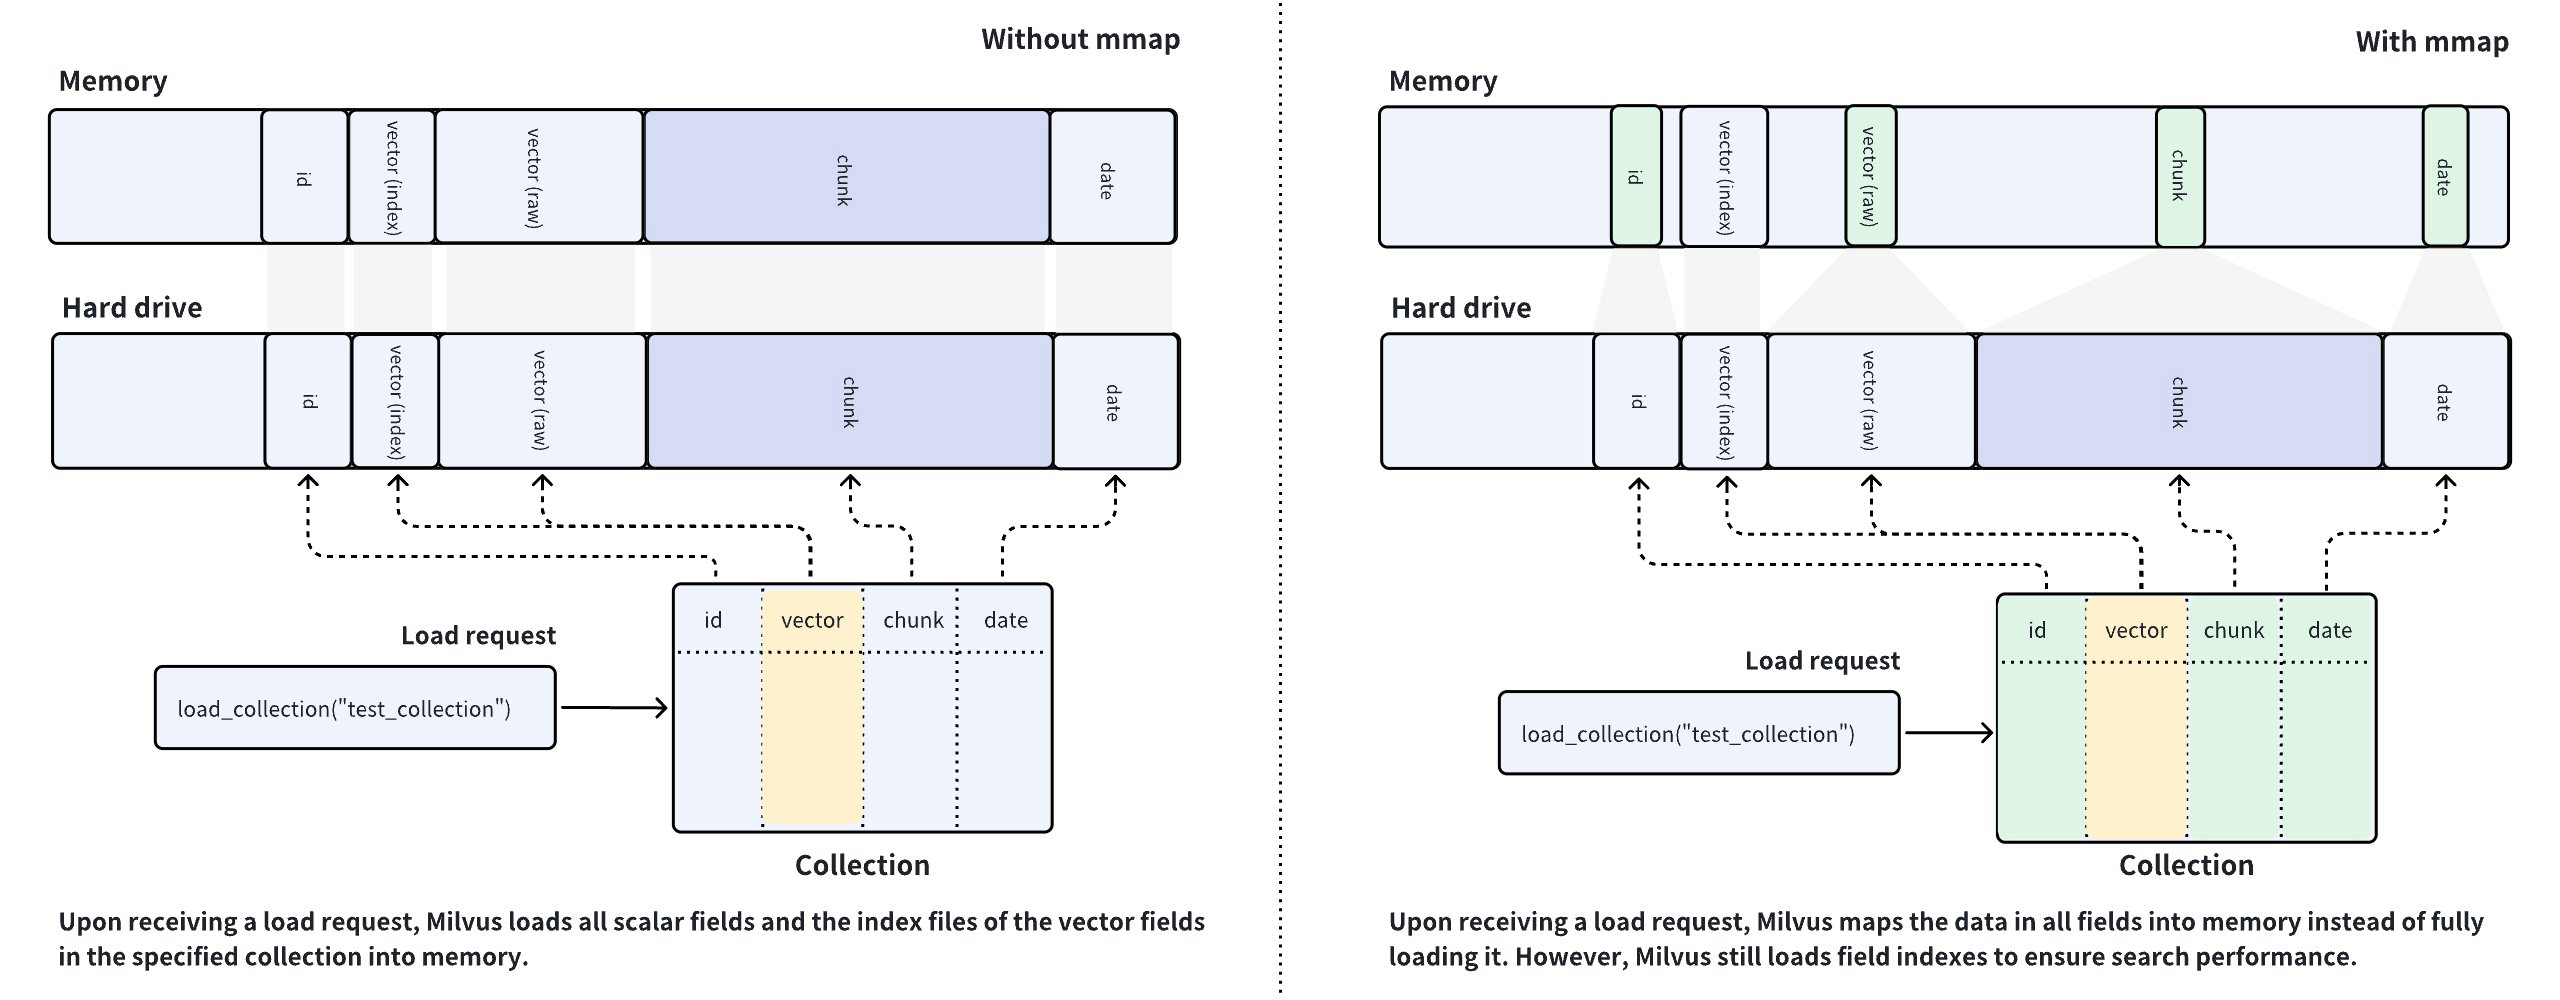
Milvus 是一个内存密集型数据库系统,可用内存大小决定了 collection 的容量。如果数据大小超过内存容量,则无法将包含大量数据的 field 加载到内存中,这是 AI 驱动应用程序的常见情况。
为了解决此类问题,Milvus 引入了 mmap 来平衡 collection 中热数据和冷数据的加载。如上图右侧所示,您可以配置 Milvus 对某些 field 中的原始数据进行内存映射,而不是将它们完全加载到内存中。这样,您可以获得对这些 field 的直接内存访问,而无需担心内存问题,并扩展 collection 的容量。
通过比较左右两图中的数据放置过程,您可以发现左图中的内存使用量比右图要高得多。启用 mmap 后,本应加载到内存中的数据被卸载到硬盘中,并缓存在操作系统的页面缓存中,减少了内存占用。但是,缓存命中失败可能导致性能下降。详细信息请参阅这篇文章。
在 Milvus 上配置 mmap 时,始终要遵循一个原则:始终将频繁访问的数据和索引完全加载到内存中,并对剩余 field 中的数据使用 mmap。
在 Milvus 中使用 mmap
Milvus 在全局、field、index 和 collection 级别提供分层的 mmap 设置,其中 index 和 field 级别优先于 collection 级别,collection 级别优先于全局级别。
全局 mmap 设置
集群级设置是全局设置,具有最低优先级。Milvus 在 milvus.yaml 中提供了几个与 mmap 相关的设置。这些设置将应用于集群中的所有 collection。
...
queryNode:
  mmap:
    scalarField: false
    scalarIndex: false
    vectorField: false
    vectorIndex: false
    # The following should be a path on a high-performance disk
    mmapDirPath: any/valid/path
....
配置项 | 描述 | 默认值 |
|---|---|---|
| 指定是否将所有标量 field 的原始数据映射到内存中。将此设置为 |
|
| 指定是否将所有标量 field 索引映射到内存中。将此设置为 目前,仅支持使用以下 index 类型的标量 field:
|
|
| 指定是否将所有向量 field 的原始数据映射到内存中。将此设置为 |
|
| 指定是否将所有向量 field 索引映射到内存中。将此设置为 目前,仅支持使用以下 index 类型的向量 field:
|
|
| 指定内存映射文件的路径。如果未指定此项,则应用默认值。 默认值中的 |
|
要将上述设置应用于您的 Milvus 集群,请按照使用 Helm 配置 Milvus 和使用 Milvus Operator 配置 Milvus 中的步骤操作。
有时,全局 mmap 设置在面对特定用例时不够灵活。要对特定 collection 或其索引应用替代设置,请考虑配置特定于 collection、field 或 index 的 mmap。您需要在 mmap 设置更改生效之前释放并加载 collection。
Field 特定的 mmap 设置
要配置 field 特定的 mmap,您需要在添加 field 时包含 mmap_enabled 参数。您可以通过将此参数设置为 True 来在此特定 field 上启用 mmap。
以下示例演示了如何在添加 field 时配置 field 特定的 mmap。
from pymilvus import MilvusClient, DataType

CLUSTER_ENDPOINT="http://localhost:19530"
TOKEN="root:Milvus"

client = MilvusClient(
    uri=CLUSTER_ENDPOINT,
    token=TOKEN
)

schema = MilvusClient.create_schema()
schema.add_field("id", DataType.INT64, is_primary=True, auto_id=False)
schema.add_field("vector", DataType.FLOAT_VECTOR, dim=5)

schema = MilvusClient.create_schema()

# 添加标量 field 并启用 mmap
schema.add_field(
    field_name="doc_chunk",
    datatype=DataType.INT64,
    is_primary=True,
    mmap_enabled=True,
)

# 更改特定 field 上的 mmap 设置
# 以下假设您有一个名为 `my_collection` 的 collection
client.alter_collection_field(
    collection_name="my_collection",
    field_name="doc_chunk",
    field_params={"mmap.enabled": True}
)
import io.milvus.param.Constant;
import io.milvus.v2.client.ConnectConfig;
import io.milvus.v2.client.MilvusClientV2;
import io.milvus.v2.common.DataType;
import io.milvus.v2.service.collection.request.*;

import java.util.*;

String CLUSTER_ENDPOINT = "http://localhost:19530";
String TOKEN = "root:Milvus";
client = new MilvusClientV2(ConnectConfig.builder()
        .uri(CLUSTER_ENDPOINT)
        .token(TOKEN)
        .build());

CreateCollectionReq.CollectionSchema schema = client.createSchema();

schema.addField(AddFieldReq.builder()
        .fieldName("id")
        .dataType(DataType.Int64)
        .isPrimaryKey(true)
        .autoID(false)
        .build());

schema.addField(AddFieldReq.builder()
        .fieldName("vector")
        .dataType(DataType.FloatVector)
        .dimension(5)
        .build());

Map<String, String> typeParams = new HashMap<String, String>() {{
    put(Constant.MMAP_ENABLED, "false");
}};
schema.addField(AddFieldReq.builder()
        .fieldName("doc_chunk")
        .dataType(DataType.VarChar)
        .maxLength(512)
        .typeParams(typeParams)
        .build());

CreateCollectionReq req = CreateCollectionReq.builder()
        .collectionName("my_collection")
        .collectionSchema(schema)
        .build();
client.createCollection(req);

client.alterCollectionField(AlterCollectionFieldReq.builder()
        .collectionName("my_collection")
        .fieldName("doc_chunk")
        .property(Constant.MMAP_ENABLED, "true")
        .build());
import { MilvusClient, DataType } from '@zilliz/milvus2-sdk-node';

const CLUSTER_ENDPOINT="YOUR_CLUSTER_ENDPOINT";
const TOKEN="YOUR_TOKEN";

const client = await MilvusClient({
    address: CLUSTER_ENDPOINT,
    token: TOKEN
});

const schema = [
{
    name: 'vector',
    data_type: DataType.FloatVector
},
{
    name: "doc_chunk",
    data_type: DataType.VarChar,
    max_length: 512,
    'mmap.enabled': false,
}
];

await client.createCollection({
    collection_name: "my_collection",
    schema: schema
});

await client.alterCollectionFieldProperties({
    collection_name: "my_collection",
    field_name: "doc_chunk",
    properties: {"mmap_enable": true}
});
// go
#restful
export TOKEN="root:Milvus"
export CLUSTER_ENDPOINT="http://localhost:19530"

export idField='{
    "fieldName": "id",
    "dataType": "Int64",
    "elementTypeParams": {
        "max_length": 512
    },
    "isPrimary": true,
    "auto_id": false
}'

export vectorField='{
    "fieldName": "vector",
    "dataType": "FloatVector",
    "elementTypeParams": {
       "dim": 5
    }
}'

export docChunkField='{
    "fieldName": "doc_chunk",
    "dataType": "Int64",
    "elementTypeParams": {
        "max_length": 512,
        "mmap.enabled": false
    }
}'

export schema="{
    \"autoID\": false,
    \"fields\": [
        $idField,
        $docChunkField,
        $vectorField
    ]
}"

curl --request POST \
--url "${CLUSTER_ENDPOINT}/v2/vectordb/collections/create" \
--header "Authorization: Bearer ${TOKEN}" \
--header "Content-Type: application/json" \
--data "{
    \"collectionName\": \"my_collection\",
    \"schema\": $schema
}"

curl --request POST \
--url "${CLUSTER_ENDPOINT}/v2/vectordb/collections/fields/alter_properties" \
--header "Authorization: Bearer ${TOKEN}" \
--header "Content-Type: application/json" \
-d '{
    "collectionName": "my_collection",
    "fieldName": "doc_chunk",
    "fieldParams":{
        "mmap.enabled": true
    }
}'
考虑为存储大量数据的 field 启用 mmap。标量 field 和向量 field 都支持。
然后,您可以使用上面创建的 schema 创建 collection。收到加载 collection 的请求后,Milvus 使用内存映射将 doc_chunk field 的原始数据映射到内存中。
Index 特定的 mmap 设置
要配置 index 特定的 mmap,您需要在添加 index 时在 index 参数中包含 mmap.enable 属性。您可以通过将该属性设置为 true 来在此特定 index 上启用 mmap。
以下示例演示了如何在添加 index 时配置 index 特定的 mmap。
# 添加 varchar field
schema.add_field(
    field_name="title",
    datatype=DataType.VARCHAR,
    max_length=512
)

index_params = MilvusClient.prepare_index_params()

# 在 varchar field 上创建带有 mmap 设置的 index
index_params.add_index(
    field_name="title",
    index_type="AUTOINDEX",
    params={ "mmap.enabled": "false" }
)

# 更改 index 的 mmap 设置
# 以下假设您有一个名为 `my_collection` 的 collection
client.alter_index_properties(
    collection_name="my_collection",
    index_name="title",
    properties={"mmap.enabled": True}
)
schema.addField(AddFieldReq.builder()
        .fieldName("title")
        .dataType(DataType.VarChar)
        .maxLength(512)
        .build());

List<IndexParam> indexParams = new ArrayList<>();
Map<String, Object> extraParams = new HashMap<String, Object>() {{
    put(Constant.MMAP_ENABLED, false);
}};
indexParams.add(IndexParam.builder()
        .fieldName("title")
        .indexType(IndexParam.IndexType.AUTOINDEX)
        .extraParams(extraParams)
        .build());

client.alterIndexProperties(AlterIndexPropertiesReq.builder()
        .collectionName("my_collection")
        .indexName("title")
        .property(Constant.MMAP_ENABLED, "true")
        .build());
// 在 varchar field 上创建带有 mmap 设置的 index
await client.createIndex({
    collection_name: "my_collection",
    field_name: "title",
    params: { "mmap.enabled": false }
});

// 更改 index 的 mmap 设置
// 以下假设您有一个名为 `my_collection` 的 collection
await client.alterIndexProperties({
    collection_name: "my_collection",
    index_name: "title",
    properties:{"mmap.enabled": true}
});
// go
# restful
export TOKEN="root:Milvus"

curl --request POST \
--url "${CLUSTER_ENDPOINT}/v2/vectordb/indexes/create" \
--header "Authorization: Bearer ${TOKEN}" \
--header "Content-Type: application/json" \
-d '{
    "collectionName": "my_collection",
    "indexParams": [
        {
            "fieldName": "doc_chunk",
            "params": {
                "index_type": "AUTOINDEX",
                "mmap.enabled": true
            }
        }
    ]
}'

curl --request POST \
--url "${CLUSTER_ENDPOINT}/v2/vectordb/indexes/alter_properties" \
--header "Authorization: Bearer ${TOKEN}" \
--header "Content-Type: application/json" \
-d '{
    "collectionName": "my_collection",
    "indexName": "doc_chunk",
    "properties": {
        "mmap.enabled": false
    }
}'
这适用于向量和标量 field 的索引。
然后您可以在 collection 中引用 index 参数。收到加载 collection 的请求后,Milvus 将 title field 的 index 内存映射到内存中。
Collection 特定的 mmap 设置
要配置 collection 范围的 mmap 策略,您需要在创建 collection 的请求中包含 mmap.enabled 属性。您可以通过将此属性设置为 true 来为 collection 启用 mmap。
以下示例演示了如何在创建名为 my_collection 的 collection 时启用 mmap。收到加载 collection 的请求后,Milvus 将所有 field 的原始数据内存映射到内存中。
# 创建 collection 时启用 mmap
client.create_collection(
    collection_name="my_collection",
    schema=schema,
    properties={ "mmap.enabled": "true" }
)
CreateCollectionReq req = CreateCollectionReq.builder()
        .collectionName("my_collection")
        .collectionSchema(schema)
        .property(Constant.MMAP_ENABLED, "false")
        .build();
client.createCollection(req);
await client.createCollection({
    collection_name: "my_collection",
    scheme: schema,
    properties: { "mmap.enabled": false }
});
// go
curl --request POST \
--url "${CLUSTER_ENDPOINT}/v2/vectordb/collections/create" \
--header "Authorization: Bearer ${TOKEN}" \
--header "Content-Type: application/json" \
--data "{
    \"collectionName\": \"my_collection\",
    \"schema\": $schema,
    \"params\": {
        \"mmap.enabled\": \"false\"
    }
}"
您也可以更改现有 collection 的 mmap 设置。
# 更改 mmap 设置前释放 collection
client.release_collection("my_collection")

# 确保 collection 已经被释放
# 然后运行以下命令
client.alter_collection_properties(
    collection_name="my_collection",
    properties={
        "mmap.enabled": false
    }
)

# 加载 collection 以使上述更改生效
client.load_collection("my_collection")
client.releaseCollection(ReleaseCollectionReq.builder()
        .collectionName("my_collection")
        .build());

client.alterCollectionProperties(AlterCollectionPropertiesReq.builder()
        .collectionName("my_collection")
        .property(Constant.MMAP_ENABLED, "false")
        .build());

client.loadCollection(LoadCollectionReq.builder()
        .collectionName("my_collection")
        .build());
// 更改 mmap 设置前释放 collection
await client.releaseCollection({
    collection_name: "my_collection"
});

// 确保 collection 已经被释放
// 然后运行以下命令
await client.alterCollectionProperties({
    collection_name: "my_collection",
    properties: {
        "mmap.enabled": false
    }
});

// 加载 collection 以使上述更改生效
await client.loadCollection({
    collection_name: "my_collection"
});
// go
# restful
export CLUSTER_ENDPOINT="http://localhost:19530"
export TOKEN="root:Milvus"

curl --request POST \
--url "${CLUSTER_ENDPOINT}/v2/vectordb/collections/release" \
--header "Authorization: Bearer ${TOKEN}" \
--header "Content-Type: application/json" \
-d '{
    "collectionName": "my_collection"
}'

curl --request POST \
--url "${CLUSTER_ENDPOINT}/v2/vectordb/collections/alter_properties" \
--header "Authorization: Bearer ${TOKEN}" \
--header "Content-Type: application/json" \
-d '{
    "collectionName": "my_collection",
    "properties": {
        "mmmap.enabled": false
    }
}'

curl --request POST \
--url "${CLUSTER_ENDPOINT}/v2/vectordb/collections/load" \
--header "Authorization: Bearer ${TOKEN}" \
--header "Content-Type: application/json" \
-d '{
    "collectionName": "my_collection"
}'
您需要释放 collection 以更改其属性,并重新加载 collection 以使更改生效。